How To Handstand For Beginners
A handstand is one of the most popular skills or exercises out there. It has so many benefits, it’s really fun, and looks cool. There are a lot of reasons that someone would want to do a handstand, whatever your reason is, this blog will help you get there safely and efficiently. I will go over all of the most important aspects of the handstand that beginners need to go from nothing to something. By the end of this article you’ll know the best way to do a handstand. You are not going to want to miss any of these tips so don’t skip around, make sure to read the whole thing. I’m going to give you tips to think about and drills to do, all of which will be a game changer for your handstand. Before I get started I want to emphasize that the handstand is a never ending journey. There are so many stages to this process and it’s the fact that it’s not an easy journey that makes it so rewarding. I have been doing handstands for almost a decade and I am still learning and still improving. There will be times on this path where you will think it’s impossible, and then there will be times that you look back and laugh about what you used to think was impossible. Don’t get frustrated, don’t quit. If I can do it, so can you!

The Foundation
Like a house, the most important aspect of the handstand is the foundation. You have to think about building this skill from the ground up. This means focusing on our hands' connection with the ground. If your connection with the ground is off, then everything else will be off as well. If your weight is in your palms and you are sunk into your shoulders then it won’t matter if your glutes are engaged or your toes are pointed.
Let’s talk about your hand placement and finger activation. When you plant your hands on the ground you want to make sure that your index finger is facing forward. Most of the time when you plant your hands on the ground for a handstand, or even a push-up, you’ll notice that your middle finger is usually facing forward. Make a small adjustment to move your index finger facing forward and then screw your hands into the floor. Basically, you are going to twist your right arm to the right and your left arm to the left without moving your hands. This brings your elbows to face behind you and your biceps to be facing in front of you. Your arms should be completely straight now. This is called external rotation and it’s the first step to creating the stability in your shoulders that is needed to support your bodyweight in a handstand. The next thing you want to do is get your fingers involved. To do this you are going to press your fingertips into the floor, think about grounding them like the roots of a tree. Practice this one hand at a time by placing your right hand down and pressing your fingertips into the floor. With your left hand, one at a time try to lift each finger of the right hand off the floor. If any fingertip comes up then you fail. Practice this until you're able to keep all of your fingers grounded. If you have another person to help you then they can try gently lifting your fingertips off the ground while you are doing things like planks, push-ups, crow pose, and a wall-assisted handstand. If you can’t activate your fingertips then this probably means you feel the weight in the palm of your hand and we want to correct that immediately. Trying to balance a handstand with the weight in your palms is really difficult and it’s a higher risk of injury than having the weight in your fingertips. This activation in your fingertips is going to come up again when we talk about balance.
Your elbows are next on the foundation’s list. You have to make sure your arms are straight so there can’t be any bend in the elbows. That means creating the external rotation that I mentioned earlier and pushing the floor away from you. Go into tabletop position(on your hands and knees with your hands under shoulders, knees under hips) and straighten your arms completely. Now think of them as railroad tracks. If one of them bends that's the same as a defective track that would make the train derail. Don’t derail your train. Externally rotating while pushing the floor away will keep your arms straight and stable. When I say push the floor away in handstand you are going to be doing an upside-down shrug. You can practice this from a standing position by bringing your arms overhead and reaching tall. Imagine there is a drop ceiling a half-inch above your arms. Flex your hands as if you were in a handstand on the floor and think about lifting the drop ceiling off the frame. At the correct position, your shoulders will be covering your ears. If there's a space between your ears and your shoulders then you aren’t pushing enough. When you do this don’t let your back arch. That’s mimicking a handstand.
Balance
Balance can’t be taught, it has to be learned. I am going to give you some key advice to take control of your handstand but it’s up to you to apply it all and start to find the balance on your own. You have to develop this feel for balance and it will improve over time. The better you get the calmer you will feel, the more still you will become, and the fewer corrections you will have to make. Every time you push your fingertips into the ground to save your balance you are making a correction. At first, you’ll be pushing your fingertips into the ground like mad to keep your balance so you will be making a lot of corrections per second. The goal is to reduce the number of corrections per second that you make while in a handstand.
It’s important to understand how similar balancing on your hands is to balancing on your feet. Let’s talk about a couple of things we do to stand on our feet that we may not normally think about because it’s so natural to us. I want you to stand(barefoot) with your feet about hip-distance apart and close your eyes. Feel where the weight is in your feet when you stand there. Notice how much of your weight is favoring the ball of your foot and not the heel. That’s how the handstand should feel. Then, with your eyes open, I want you to very slowly lean forward but press your toes into the floor to stop yourself from stepping forward and instead return to standing straight up. You’ll notice if you fall too fast you won’t be able to stop yourself with just your toes and that’s the same thing as falling over in a handstand too fast and not being able to stop yourself with your fingers.
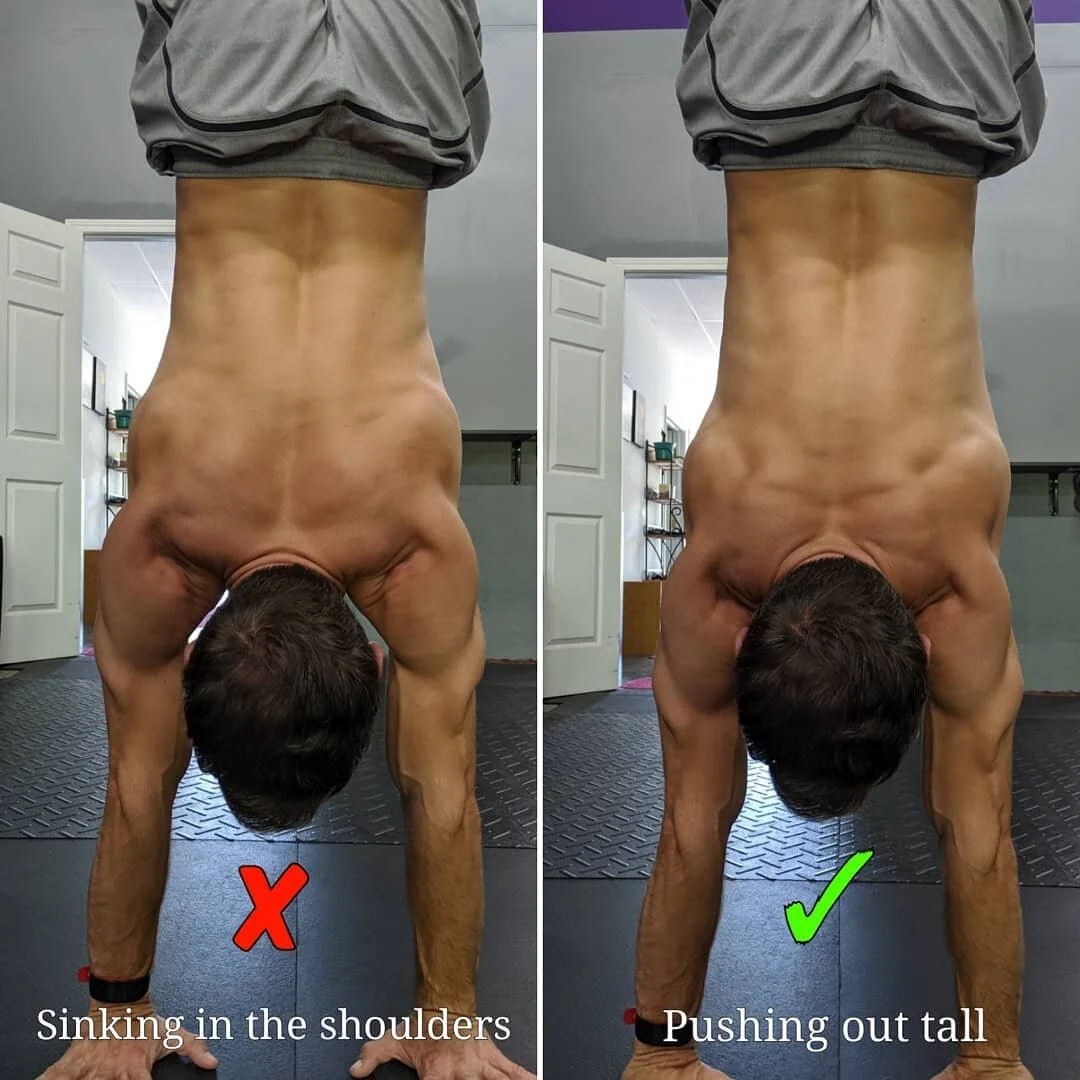
Body Position and Shape
When it comes to body position and shape it’s important to have your shoulders open and your back flat. Two things can affect shoulder position. A lack of pushing out tall, and a lack of shoulder mobility. I spoke about pushing out tall earlier in the article. If you sink into your shoulders you are closing the angle which is a poor body position for handstands. If you ever hear the term planch arms that is referring to a closed shoulder angle. You need to push out tall as much as you can to make sure your shoulders are stacked on top of your wrists to avoid the planche arms. An arched back is not something to lose sleep over when it comes to handstands. It’s actually a common shape most beginners start out with but over time you will develop more strength and technique to straighten out. I never discourage someone's handstand because they have an arched back. If that’s you, continue to push out tall and develop awareness for your body shape by practicing it when you aren't upside down. If you can balance a handstand but you're in a banana back shape that’s ok, enjoy your progress so far and be ready to improve.
How To Practice
There are a lot of ways to practice a handstand but I’m going to narrow it down to some of the best drills to cover the most important aspects of the skill. These will be drills to help your strength, balance, and your entrance into the handstand.
Strength - When it comes to strength in a handstand it’s important to be proficient in a few bodyweight movements. The handstand is a push exercise so it’s important to strengthen your push muscles like the shoulders, chest, and triceps. Being able to do 10 strict push-ups could be a great prerequisite to a handstand. I’m not saying you have to be able to do 10 push-ups to do a handstand but it sure would increase your chances of improving. That would reflect strong push muscles as well as strong wrists to support your body weight.
Balance - There is one drill in particular that I have used to teach hundreds of students how to balance a handstand. This is probably the biggest piece of advice I can give you when it comes to practicing a handstand. When you are using a wall to practice balancing a handstand, you have to train stomach-to-wall handstands. This is the best way to replicate the skill so that’s the option you want to take when training the skill. I talked a lot about the fingertips earlier in this article and here we are to circle back to that same discussion. Your fingertips are your brakes, they are going to stop you from falling over. So when you train stomach to wall handstands and slowly lean forward to load the weight into your fingertips you are mimicking the same feeling as going into a handstand. That allows you to use your fingers to feel your weight shift over your hands. On the other hand, if you train a back-to-wall handstand and then kick your feet off the wall to balance, you are loading the weight into your palms and you have no brakes to stop you from falling down to your feet. You can push into your palm all you want but it won’t get you back into balance and at that point, you’ll never be able to transfer the weight into your fingertips. Below I am including a video that explains the same things here but with visual aids. I also demonstrate exactly how you can practice stomach-to-wall handstands so make sure to go back and watch the video after you read the rest of this article.
One of my favorite ways to replicate the balance of a handstand without actually being in one is crow pose. When you balance crow pose you will be using your fingertips in the same way you would in a handstand. You have to shift your weight forward so it can’t be in the palms. And when you start to feel those corrections happening in your fingertips you know you are balancing. In both crow pose and handstand, you are going to have to shift your body over your hands much more than you think. Getting used to this feeling in crow pose may feel more comfortable because you keep your entire body closer to the ground than in a handstand. Below is a link to a video tutorial on crow pose. If you aren’t familiar with what I’m talking about then make sure to watch this video. If you can already do crow then you may still want to watch the video because you could pick up a new tip that could help you out a bit.
Entrance - I am going to tell you the best way to kick up into a handstand. The kick-up is when you are standing straight up on your feet and then you plant your hands on the ground to kick your legs up and into a handstand. The main thing for getting into a handstand is to get your hips over your shoulders. The goal here is to basically flip yourself upside down in the most efficient way possible. You want to get into your handstand while doing as little extra work as possible. That means starting in the handstand shape and finishing in the handstand shape. To do this we use an entrance that doesn’t require you to bend at the hips. You keep your body straight and lever into the position with a lunge step in the legs. The first thing you need to do is find the distance between your hands and feet where you will plant your hands. To do this you are going to lie on your stomach with your hands overhead. Wherever your hands are is where you are going to mark as your hand placement point. It helps if you mark it with a piece of tape or a quarter. Next you are going to replicate the handstand on your feet. So, feet together, arms overhead, core and glutes engaged. Start in a handstand shape, end in a handstand shape. You are going to take a big step forward similar to a long lunge. Your front leg will bend but your back will stay flat and you will not pike at the hips at all. Keep squeezing your core the entire time. When your leg hits the ground you will reach forward with your hands to place them on the outside of your marker. Your back leg will have started to lift off the ground at this point so you will drive your foot towards the ceiling which will bring your hips over your shoulders. Next you will bring your other leg up to meet the first one. Think about connecting your ankles together at the top. Check out the video below for a visual breakdown.
Scissor switches are one of my favorite drills for students to use to help with their kick up to handstand. They teach you two things, one, what the weight shift from your palms to your hands feels like during the kick-up, and two, how to control your kick-up to handstand. This drill starts in a single-leg down dog position with your right leg up. At this point, you can start to press your fingertips into the ground but you will feel most of the weight in your palms. Lower your right leg down a couple of inches and then drive it up towards the ceiling so your left foot floats off the ground a little bit. You’ll notice that as you shift forward the weight changes from your palms to fingertips. Do this until you get really good at creating float with the leg that’s coming off the ground. Once you can create a few inches of space between your foot and the floor then you can start to switch your legs out. The leg that is up goes down and the leg that was down goes up. Over time you will be able to use these controlled floats to spend more time inverted and get the feel for entering a handstand.
Extra Drills
These drills are going to be ways to practice your handstand without actually getting upside down. Oftentimes I see students waste a training session by just kicking up and down into a handstand when they can’t actually hold a handstand. While this is fun and rewarding at times, it may not be the best way to improve your handstand. The following drills are going to help you build strength needed to hold yourself upside down and develop the awareness of having your hips over your shoulders.
The goal of this exercise is to find a little bit of float in a tuck position, it’s not to get all the way into a handstand. You will load the weight into your fingers and hop into a ball while keeping your arms straight and pushing into the floor. If you don’t push into the floor enough then your shoulders will close and you won’t have control of the movement. When jumping into a handstand we want to get our hips 100% over our shoulders, in this exercise, it’s more like 80 percent. The more you can control this the better it will relate to handstands over time.
This drill is great to understand shifting the weight into your fingertips and feeling your hips start to come over your shoulders. It’s also going to planche your shoulders if you aren’t pushing the floor away. The common theme in these exercises is to push push push!
I’ll give you one guess what is important about this drill. That’s right, push the floor away. It’s really important not to sink into the shoulders when walking your hands to and from the box. Keep pushing tall and keep your hips stable, don’t let them wiggle side to side too much.
Warm-Up For Handstand
A proper warm-up is essential for a solid handstand training session. Getting the joints and muscles active and prepared for exercise is really important, especially for speciality skills like the handstand. Our wrists were not designed to support the weight of our entire body so we have to prepare them by making sure they are good and warm. Our shoulders will take a lot of strain during training as well so a solid warm-up for the upper body is important as well. Here are my go-to warm-up drills for handstands. Do 8 to 10 exercises for each exercise.
Patience
Perhaps the best attribute you can have in a handstand journey is patience. You have to understand that this is a long process. There are no shortcuts and it’s not going to happen overnight. You may be starting with a good foundation of strength or mobility but there will always be something to work on when it comes to a skill like this. If you are smart and consistent then you will be able to handstand. Be patient in the short and long term.
Short term - Even the pros have bad days. Something you will find out real quick is that not every session is going to be a great session. You may have a couple of good sessions and then just completely stink up the place the next session you have. Don’t get frustrated, don’t let that take away from the fun of the journey. After all, how cool is it that we are even able to practice balancing on our hands in the first place?
Long term - At the beginning of this article, I mentioned that handstands are a never-ending journey. That doesn’t mean that if you set out to achieve a handstand that it’s going to take forever to accomplish. It just means that there is always going to be something to improve on or something new to work on. You will go from not being able to do a handstand at all to finding new ways to enter it and new shapes to make. You can take this practice as far as you want and the more advanced you get the more you can challenge yourself. That’s what drew me in and kept me so close. I still get the same feeling I did when I first started practicing handstands.
Wrapping up
There you have it, the ultimate guide to taking your handstand from nothing to something. These are the most important things I’ve learned in my handstand journey from some of the most respected coaches in the world. They have helped me and my students progress this skill to the most fun and rewarding movement I’ve ever experienced. Like I said earlier, it’s not easy and it doesn’t happen overnight. But you can do it. I believe in you 100%.
If you have any questions on anything I discussed or if you have any questions about your practice in particular, I am here to help. Feel free to email me at my personal email to pick my brain about what is holding you back. I respond to all emails within 24-48 hours. Contact me at Patrick@mimathletics.com. You can also find more tips in my video section so make sure to check that out as well.
If you are looking for a personalized approach to your nutrition and fitness coaching, feel free to check out my online coaching page. Thank you for taking the time to read this article. Remember to subscribe to my mailing list to get updates on new blogs, helpful videos, and other coaching updates. When you sign up you will receive a free copy of my Bodyweight Workouts For The Win eBook but I promise I won’t bombard you with pointless emails.
Much Love
PLD